Frequency separation retouching has become a popular portrait retouching technique. It is an easy way to edit portraits to clean out blotches and imperfections without worrying about loss of detail or texture. It is the technique used by magazine editors to clean photos of models especially for closeup shots.
I have been doing photoshop retouching for the last three years and frequency separation is one of the tools in my arsenal. It is fast and super easy to do but with impressive results. The best thing about it is that it looks all natural as it preserves skin texture.
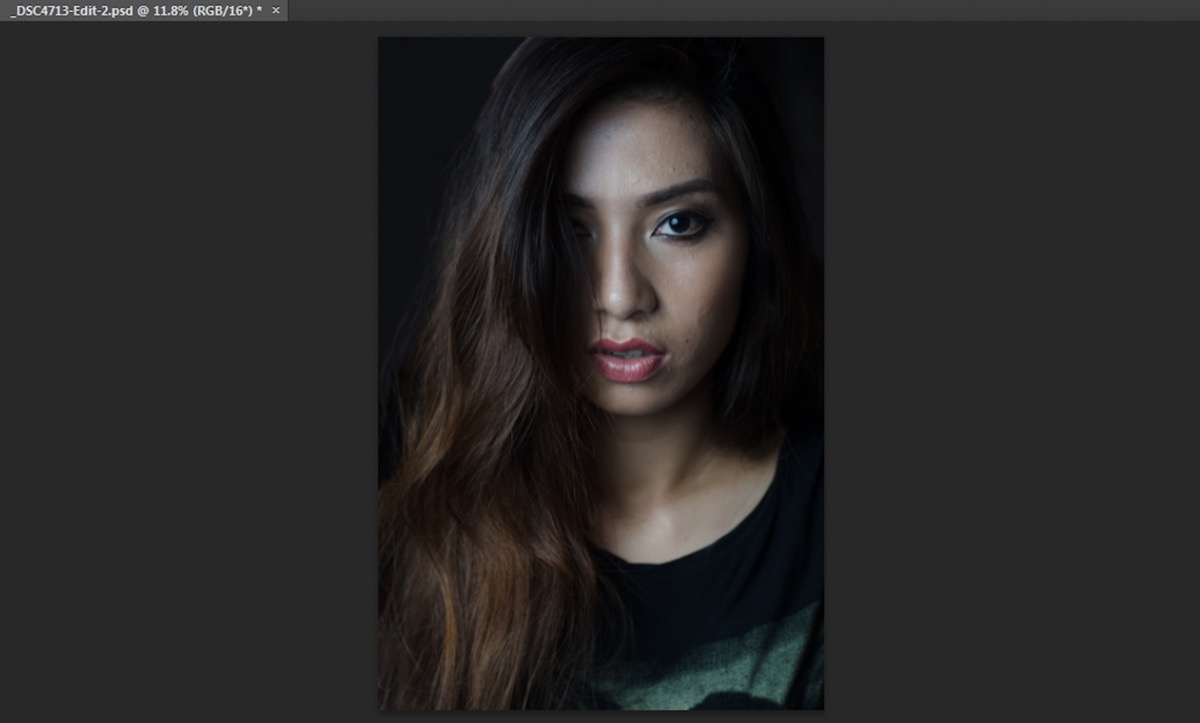
This is the original image. I out some of the background stuff a bit before starting the step by step.
The photo…
This photo is one that I shot around 2 years ago with a model. This particular portrait was for the portfolio of the makeup artist I work with. I chose this photo because it emphasizes the closeup skin textures that we want to edit out.

These are the areas that we will be working on…
What to edit
I took the liberty of highlighting a few areas of the subject’s face for us to edit. If you can see from the photo, there are a number of spots that we would like to correct. There are blotches, pimples, scars and other imperfections that we would want to clean.
Step 1: Create copies
First thing you need to do with frequency separation retouching is to create two copies of your base layer. I would recommend renaming the first copy as “low” and the second layer as “high”. Toggle the “high” layer visibility to off. Group the copies in a folder and rename the group to frequency separation.
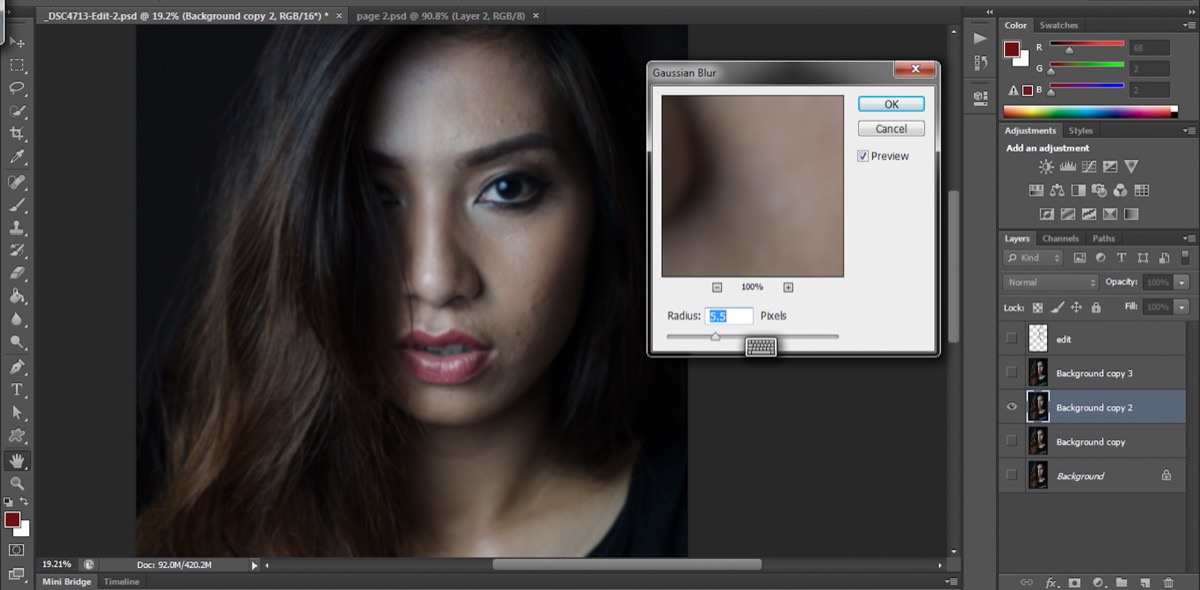
add enough Gaussian Blur to make the skin texture disappear…
Step 2: Adding Gaussian Blur
The next step is to select the “low” layer. Then go to Filter and select Gaussian Blur. Add enough blur to the image that the skin texture disappears but not too much that everything blends together. I usually set the blur from around 4 to 8 depending on the photo. In the example I used 5.5 on the Gaussian Blur.
Before changing the layer blending mode, the “high” layer will look grey. You can see some of the details like the eyes.
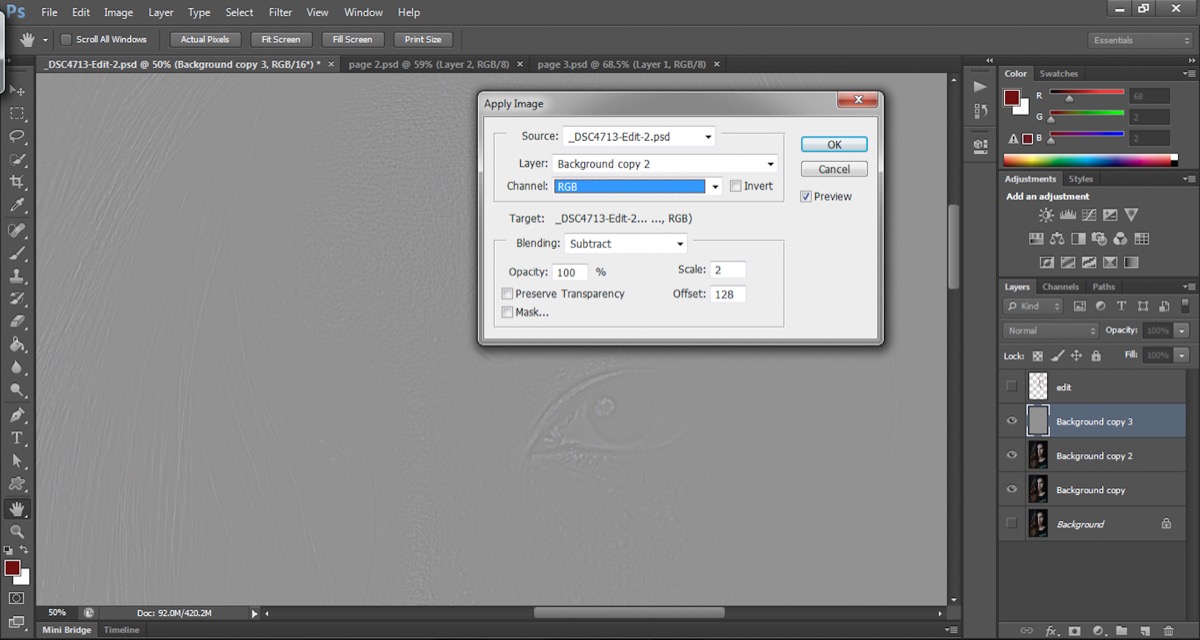
Step 3: Apply Image
Step 3 starts off by toggling the “high” layer visibility to on. Select the “high” layer and then go to Image and select Apply Image. In the layer selection choose the “low” layer. For the blending selection choose Subtract. Add the value 2 for Scale and 128 for Offset. I’m sure there is a complicated explanation for the values of Scale and Offset but I am not the one who authored this technique. I just use the recommended values.
Once you set the values, you will see that the layer will turn grey with some faint details. These are the details that are blurred out from the “low” layer. Change the blending mode of the layer to Linear Light to complete the step.
The Gaussian Blur used to even out skin tone is a little more than what you used in the “low” layer.
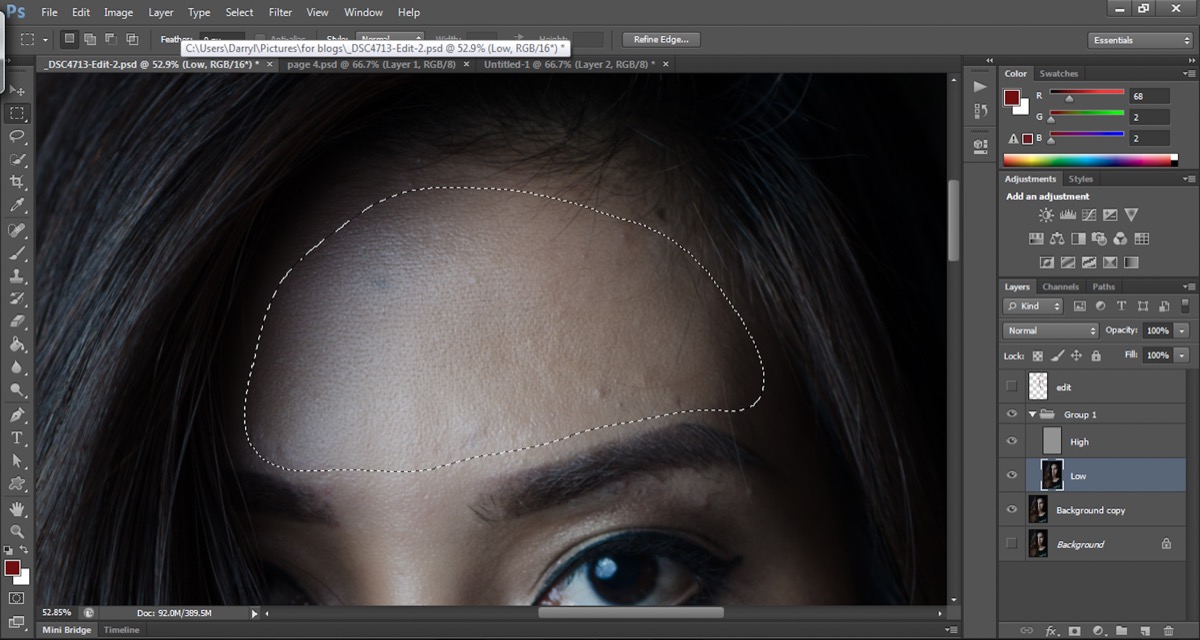
Step 4: Remove Blotches
The next step is to remove the uneven colors of the skin. Select the “low” layer. Use the Lasso Tool and select an area that has uneven skin tone. Be sure to change your feather to somewhere around 30px to make the transition smoother. Once you have selected an area, add more Gaussian Blur to it. Set the blur radius to a point where the skin tone blends well. Repeat this for all the areas where you think there are uneven tones.
You can also clone out areas where there are different colors on the skin. A good example would be a pimple or a dark scar. Once you cloned it out, select the general area of the imperfection and then apply Gaussian Blur to even it out. You can see in this step of Frequency Separation retouching you are only dealing with the skin color or tone and not the details. Toggle the visibility of the group on and off to see the difference.
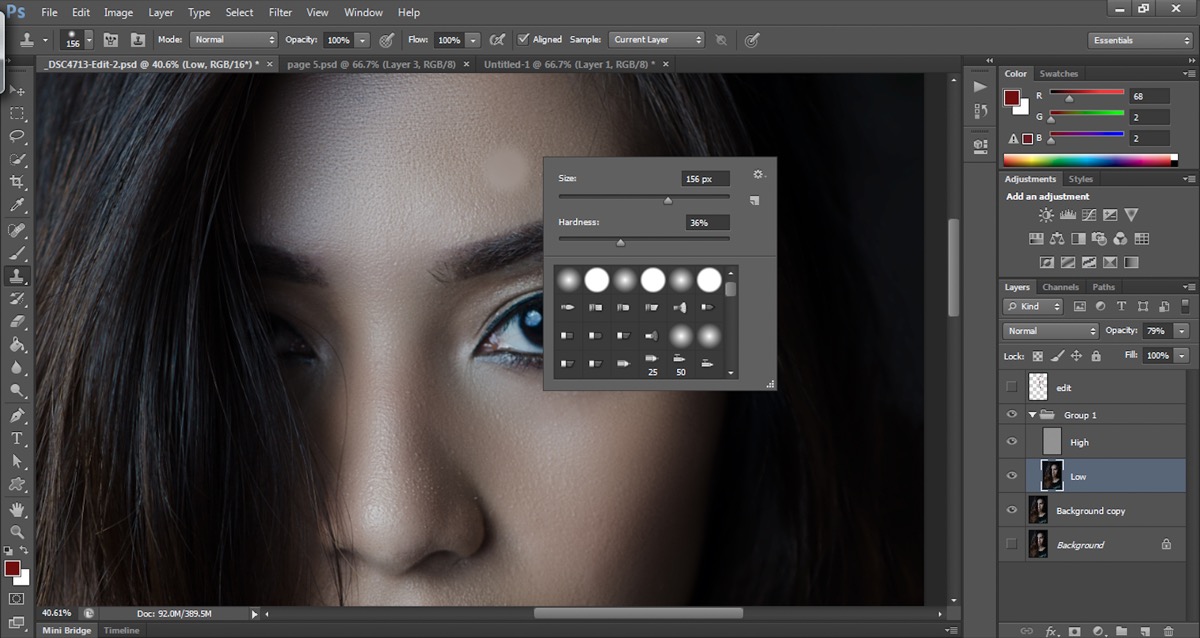
Use the clone stamp tool to remove imperfections in the “high” layer…
Step 5: Edit Textures
For step 5, you should select the “high” layer. Select the cloning tool and change the Sample Layer to Current Layer. Clone out the imperfections like scars or pimples. You can also remove wrinkles and eye bags this way. What is neat about it is that when you clone out things, only the textures are cloned not the color. So you can sample from one area where there is a different color and apply it to another area. Do this to all the areas where you need to clone out.
The last thing to do is just to adjust the opacity of the group. Apply as much or as little of this beauty retouch as you wish by adjusting the opacity. Set the opacity to what you think is best for your photo. After that you are done with Frequency Separation retouching!
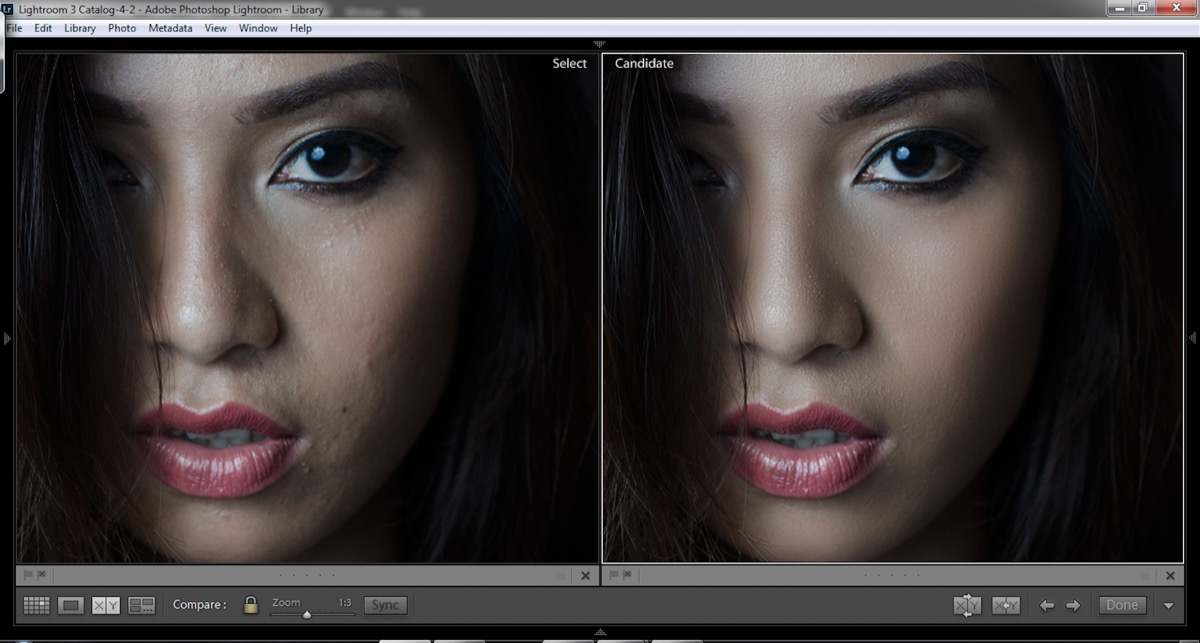
I used Lightroom for the before and after image. You can clearly see the difference…
Before and After…
I am adding this before and after so that you can see the results. This portrait retouching technique can be done very little time once you get the hang of it. As you get better, you will see the quality of your retouching get better.
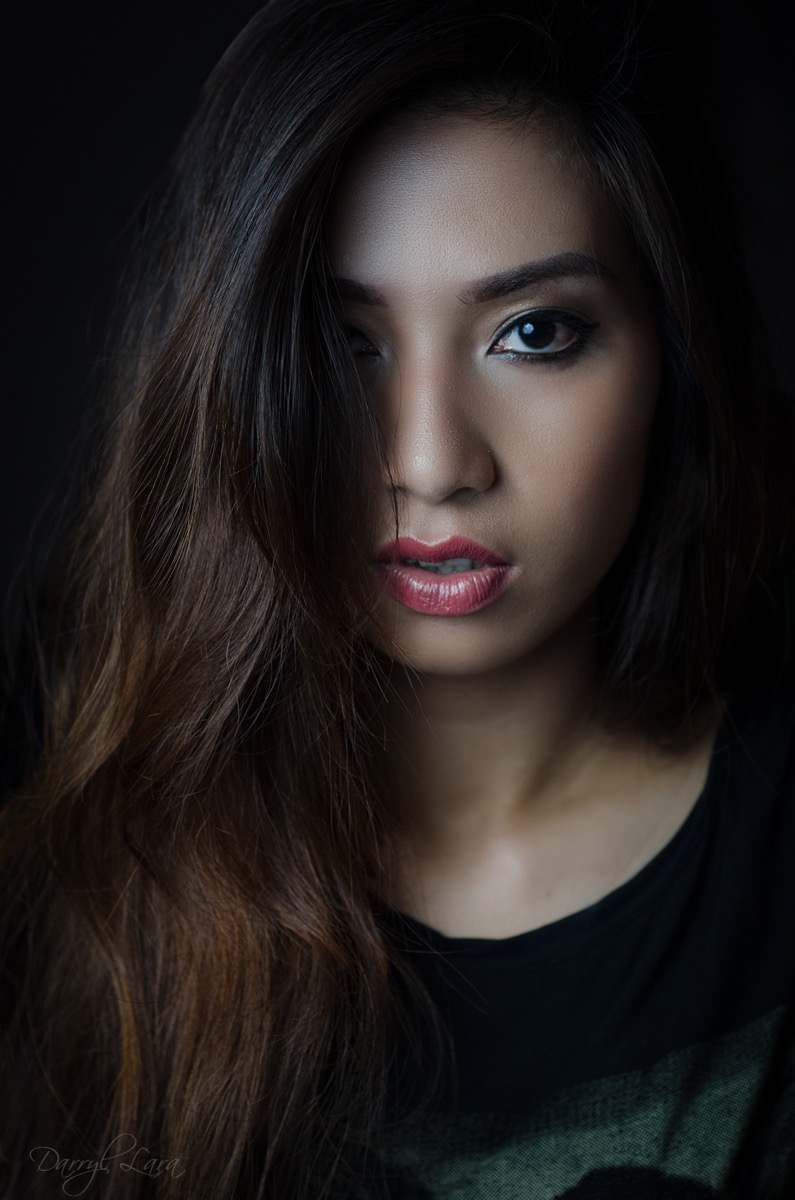
Photoshop Tips: Frequency Separation Retouching – Final Image
The Final Image
The final image of the portrait is at the top of this blog. It is not yet perfect but I edited it in just under 15 minutes which also included me taking time to capture the process. I added sharpening and vignette to the final image as those are normal parts of my workflow.
There you have it, a quick and easy photoshop step by step guide to Frequency Separation retouching. Use this technique and I guarantee that the results are very impressive. It is super simple to do and very quick too.
If you find this post helpful, please leave a comment below. You can also ask me about clarifications on how to do this technique. You can also comment on what you want us to feature in our how-to section with regards to photo editing.
Have fun!